The Qt 6 Book
Contribute!
Contribute!
  • Preface

    • Welcome!
    • Acknowledgements
    • Authors
  • Meet Qt

    • Qt and Qt Quick
    • Qt Building Blocks
    • Qt 6 Introduction
  • Getting Started

    • Quick Start
    • Installing Qt 6 SDK
    • Hello World
    • Application Types
    • Summary
  • Qt Creator IDE

    • Qt Creator IDE
    • The User Interface
    • Registering your Qt Kit
    • Managing Projects
    • Using the Editor
    • Locator
    • Debugging
    • Shortcuts
  • Quick Starter

    • Quick Starter
    • QML Syntax
    • Core Elements
    • Components
    • Simple Transformations
    • Positioning Elements
    • Layout Items
    • Input Elements
    • Advanced Techniques
  • Fluid Elements

    • Fluid Elements
    • Animations
    • States and Transitions
    • Advanced Techniques
  • QtQuick Controls

    • UI Controls
    • Introduction to Controls
    • An Image Viewer
    • Common Patterns
    • The Imagine Style
    • Summary
  • Model View

    • Model-View-Delegate
    • Concept
    • Basic Models
    • Dynamic Views
    • Delegate
    • Advanced Techniques
    • Summary
  • Canvas

    • Canvas Element
    • Convenience API
    • Gradients
    • Shadows
    • Images
    • Transformation
    • Composition Modes
    • Pixel Buffers
    • Canvas Paint
    • Porting from HTML5 Canvas
  • Shapes

    • Shapes
    • A Basic Shape
    • Building Paths
    • Filling Shapes
    • Animating Shapes
    • Summary
  • Effects

    • Effects in QML
    • Particle Concept
    • Simple Simulation
    • Particle Parameters
    • Directed Particles
    • Affecting Particles
    • Particle Groups
    • Particle Painters
    • Graphics Shaders
    • Shader Elements
    • Fragment Shaders
    • Wave Effect
    • Vertex Shader
    • Curtain Effect
    • Summary
  • Multimedia

    • Multimedia
    • Playing Media
    • Sound Effects
    • Video Streams
    • Capturing Images
    • Summary
  • Qt Quick 3D

    • Qt Quick 3D
    • The Basics
    • Working with Assets
    • Materials and Light
    • Animations
    • Mixing 2D and 3D Contents
    • Summary
  • Networking

    • Networking
    • Serving UI via HTTP
    • Templates
    • HTTP Requests
    • Local files
    • REST API
    • Authentication using OAuth
    • Web Sockets
    • Summary
  • Storage

    • Storage
    • Settings
    • Local Storage - SQL
  • Dynamic QML

    • Dynamic QML
    • Loading Components Dynamically
    • Creating and Destroying Objects
    • Tracking Dynamic Objects
    • Summary
  • Javascript

    • JavaScript
    • Browser/HTML vs Qt Quick/QML
    • JS Language
    • JS Objects
    • Creating a JS Console
  • Qt C++

    • Qt and C++
    • A Boilerplate Application
    • The QObject
    • Build Systems
    • Common Qt Classes
    • Models in C++
  • Extending QML

    • Extending QML with C++
    • Understanding the QML Run-time
    • Plugin Content
    • Creating the plugin
    • FileIO Implementation
    • Using FileIO
    • Summary
  • Qt for Python

    • Qt for Python
    • Introduction
    • Installing
    • Building an Application
    • Limitations
    • Summary
  • Qt for MCUs

    • Qt for MCUs
    • Setup
    • Hello World - for MCUs
    • Integrating with C++
    • Working with Models
    • Summary

Creating a JS Console

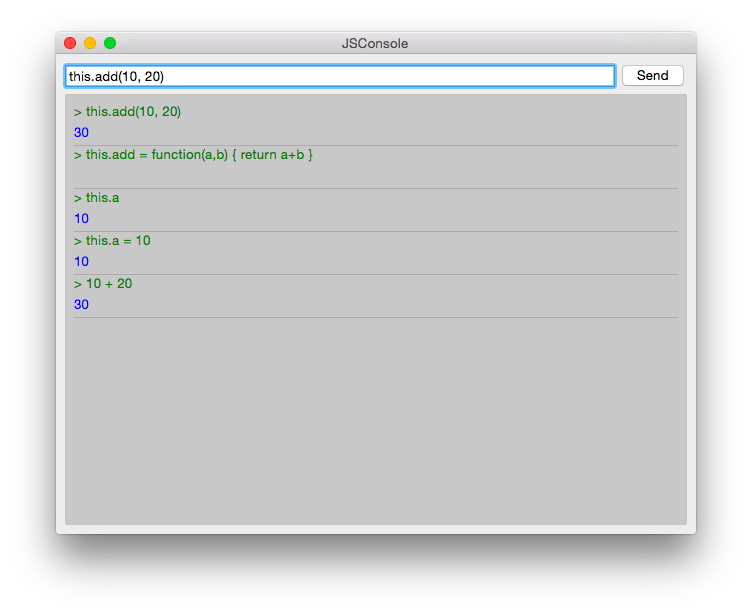
As a little example, we will create a JS console. We need an input field where the user can enter his JS expressions and ideally there should be a list of output results. As this should more look like a desktop application we use the Qt Quick Controls module.

Tips

A JS console inside your next project can be really beneficial for testing. Enhanced with a Quake-Terminal effect it is also good to impress customers. To use it wisely you need to control the scope the JS console evaluates in, e.g. the currently visible screen, the main data model, a singleton core object or all together.

image

We use Qt Creator to create a Qt Quick UI project using Qt Quick controls. We call the project JSConsole. After the wizard has finished we have already a basic structure for the application with an application window and a menu to exit the application.

For the input, we use a TextField and a Button to send the input for evaluation. The result of the expression evaluation is displayed using a ListView with a ListModel as the model and two labels to display the expression and the evaluated result.

Our application will be split in two files:

  • JSConsole.qml: the main view of the app
  • jsconsole.js: the javascript library responsible for evaluating user statements

JSConsole.qml

Application window

// JSConsole.qml
import QtQuick
import QtQuick.Controls
import QtQuick.Layouts
import QtQuick.Window
// #region import
import "jsconsole.js" as Util
// #endregion import

ApplicationWindow {
    id: root
    
    title: qsTr("JSConsole")
    width: 640
    height: 480
    visible: true

    menuBar: MenuBar {
        Menu {
            title: qsTr("File")
            MenuItem {
                text: qsTr("Exit")
                onTriggered: Qt.quit()
            }
        }
    }

Form

<!-- @include: src/JSConsole/JSConsole.qml#form{12,19,40-42,45,50,54-55} -->

Calling the library

The evaluation function jsCall does the evaluation not by itself this has been moved to a JS module (jsconsole.js) for clearer separation.

import "jsconsole.js" as Util

function jsCall(exp) {
    const data = Util.call(exp)
    // insert the result at the beginning of the list
    outputModel.insert(0, data)
}

Tips

For safety, we do not use the eval function from JS as this would allow the user to modify the local scope. We use the Function constructor to create a JS function on runtime and pass in our scope as this variable. As the function is created every time it does not act as a closure and stores its own scope, we need to use this.a = 10 to store the value inside this scope of the function. This scope is set by the script to the scope variable.

jsconsole.js

// jsconsole.js
.pragma library

const scope = {
    // our custom scope injected into our function evaluation
}

function call(msg) {
    const exp = msg.toString()
    console.log(exp)
    const data = {
        expression : msg,
        result: "",
        error: ""
    }
    try {
        const fun = new Function('return (' + exp + ')')
        data.result = JSON.stringify(fun.call(scope), null, 2)
        console.log('scope: ' + JSON.stringify(scope, null, 2), 'result: ' + data.result)
    } catch(e) {
        console.log(e.toString())
        data.error = e.toString()
    }
    return data
}

The data return from the call function is a JS object with a result, expression and error property: data: { expression: "", result: "", error: "" }. We can use this JS object directly inside the ListModel and access it then from the delegate, e.g. delegate.model.expression gives us the input expression.

Help us improve this page!
Last Updated: 11/26/25, 7:55 PM
Contributors: Fabrice SALVAIRE
Prev
JS Objects